The Best Coffee to Use With a French Press
Beans
Roast
Typically, a medium-to-dark roast is used. This is where the commonly termed “French Roast” sits on the roast level scale from light to dark.
Grind
A coarse grind with even particle size is recommended.
Coffee that is freshly ground shortly before brewing is the best possible option, but you can certainly use coffee that you purchased already-ground. Just be aware of the grind size. Look for a coarse grind and avoid finer grinds like that created for espresso.
The Right Grind Makes All the Difference
We can’t say often enough how important grind is to the flavor of your coffee. And this is especially true with the French Press. There are three things that will help you get the best results.
Coarse Grind Size
There is variation from grinder to grinder, but “coarse” for our purposes has been described as roughly the size of breadcrumbs or steel cut oats. This helps to prevent grinds from slipping through the plunger and causing over-extraction.
Even Particle Size
Consistent particle size contributes to better flavor as well as a better drinking experience. When coffee grounds contain a mix of uneven sizes, some will extract more than others during steeping, which tends to cause a muddiness in the taste of the coffee. Also, a consistent grind leaves far less sediment at the bottom of your cup.
Freshly Ground Just Before Brewing
The less time between grinding and brewing the better. Coffee begins to lose its flavor qualities almost as soon as it is ground. So if you want to capture all the flavor your beans have to offer, go directly from grinding to brewing.
Measurements and Ratios
The ratio of coffee and water used with a French Press has a big impact on the results you get. And there are basically two methods to measuring your coffee and water: by volume and by weight. Measuring by volume uses a recipe of tablespoons of coffee to cups of water. Measuring by weight uses a kitchen scale to dose grams of coffee and grams of water. Recommendations vary significantly among coffee roasters.
Measuring by Volume
Coffee and Water by Volume
| Servings | Whole Beans | Water |
| 1 | 2 T. | 1 cup (8 oz.) |
| 2 | 1/4 cup | 2 cups (16 oz.) |
| 3 | 1/2 cup | 4 Cups (32 oz.) |
| 3 | 1 cup | 8 Cups (64 oz.) |
Measuring by Weight
Weighing your coffee and water is another option to consider. The main advantage of measuring by weight is consistency. Once you discover the ratio that you like, its easier to repeat your results because the measurements are exact.
Coffee and Water by Weight
Start with a 1:15 ratio (15 grams of water for each 1 gram of whole beans).
| Servings | Whole Beans | Water |
| 1 | 15 g | 225 g (225 ml) |
| 2 | 30 g | 450 g (450 ml) |
| 3 | 60 g | 900 g (900 ml) |
| 3 | 120 g | 1800 g (1800 ml) |
Step-by-Step Instructions
What You'll Need
• Whole coffee beans
• Good quality water (preferably filtered)
• French Press
• Grinder
• Measuring spoon and cup
• Something to stir with (preferably wooden)
• Cups or carafe to hold all the coffee
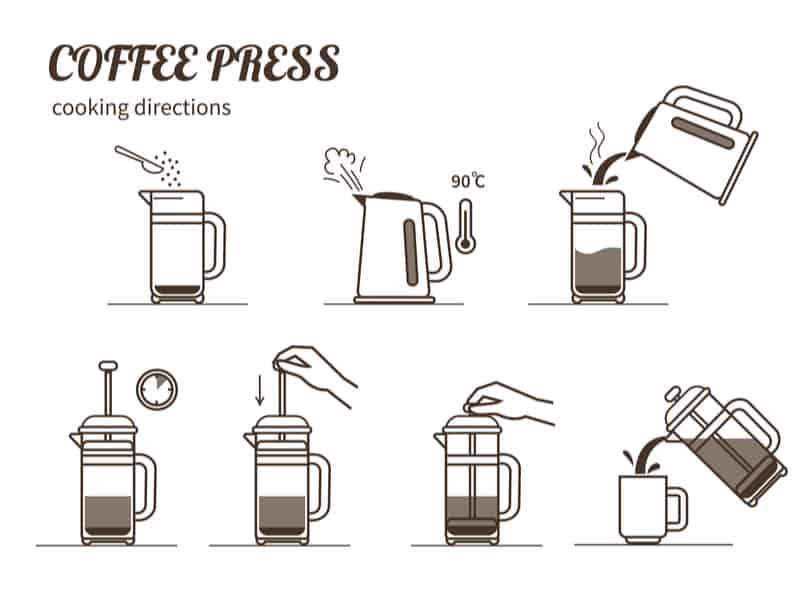
Step 1: Measure and grind the beans
Step 2: Measure and heat the water
Measure the water for the number of servings you want to make and heat to boiling. Then remove the water from the heat and let sit for about 30 seconds. This will bring the water to an optimal temperature for brewing, which is about 200 degrees F.
Step 3: Combine beans with some of the water ... let bloom
Set your timer for 4 minutes and start it. Add about twice the amount of water to the French Press as there is coffee, pouring so that all the coffee is saturated and no areas are left dry. Let sit. This is called the ‘bloom’, when carbon dioxide is being released from the coffee grounds. After 1 minute has elapsed on the timer, stir gently with a wooden utensil to break up the crust of coffee that has formed.
Step 4: Add remaining water ... let steep
Step 5: Plunge and pour

Perfecting Your Results
The French Press is easy to use, but also takes some practice. There are six main factors that affect your results: water-to-coffee ratio, water quality, water temperature, coffee grind, coffee freshness and brew time. Keep these in mind as you fine-tune your technique.
Here are tips for correcting the most common complaints. Remember that you’ll learn more and improve faster if you test one thing at a time.
Plunger Does Not Push Down Smoothly and Easily
First, check that the plunger has not been damaged in any way and still fits in the press properly. If the plunger does not go down smoothly, but more with a sudden drop, the grounds may be too coarse. If the plunger is difficult to press down, the grounds may be too fine.
Coffee is Too Strong
Try using the same grind size, but steeping it for less time. Or, use a larger grind size. You can also try using a little less coffee for the same amount of water.
Coffee is Too Weak
Measure the water for the number of servings you want to make and heat to boiling. Then remove the water from the heat and let sit for about 30 seconds. This will bring the water to an optimal temperature for brewing, which is about 200 degrees F.
Coffee is Bitter
Too Much Sediment in Your Cup
If a significant number of the grinds are too small, they will escape the plunger and end up in your cup. So the size and consistency of your ground coffee should be adjusted. Another plug for a burr grinder! Also, check that the plunger fits snugly against the press wall so that it is catching the grinds as it is pushed down. Finally, pour out all but the last inch or so of coffee in the press, which is where the majority of the sediment will be.
Pro Tips
- Warm up the press before using. Fill it with hot water and let sit, then empty and begin the coffee-making process.
- Serve or store all the coffee immediately after pushing the plunger down. Do not let any coffee sit in the press and continue to brew.
- At the end of the brew, be careful not to agitate or stir up the grounds. If the plunger becomes stuck or hard to press down, gently pull it back up a bit and try again.
- Water quality matters, so at minimum be sure it is filtered. You might also try using distilled water.


